Archive Dive: Tracking Ads
You don’t need a subscription to read today’s Friday Archive Dive!
Even if you’re not a member of the site, you can read the entire post, which originally ran March 10, 2010. If you’ve ever been curious about the kind of information, tutorials and advice that you’ll get as part of your subscription to Webcomics.com, this is a good sample.
If you’d like to join the site, you can get a 12-month subscription for $30 — or you can get a one-month Trial for $5 … with no obligation after your 30 days expire.
![]() As part of a continuing effort to use Google Analytics to its fullest, I’d like to talk about using its tracking abilities to chart the performance of an ad that you create for your comic.
As part of a continuing effort to use Google Analytics to its fullest, I’d like to talk about using its tracking abilities to chart the performance of an ad that you create for your comic.
To do this, we’ll set up a landing page for the ad (as discussed here).
Goals
First, go into Analytics and do the following:
- Click on Goals in the left-hand column
- Click on Set up Goals and Funnels
- Under Goals, click on + Add Goal.
- Give your Goal a name
- Next to Goal Type, click URL Destination
- Choose Exact Match
- Enter the URL of your landing page
Whenever a visitor from your ad gets to this landing page, it registers as an “acheived goal” with Analytics. If you need more information on setting up Goals, you can check out Google’s guide.
This is nice, but it’s not spectacular. So let’s go a little further.
Tagging an ad
To track your ad’s performance, you’re gonna tag the URL you submit for your ad to point to. You’re going to add the following:
- Source: Where the ad appeared
- Medium: What kind of ad it was (banner, skyscraper, etc.)
- Name: Which campaign was this. You may as well start naming them, because you’ll probably be doing a few until you find some that work consistently.
Now we’ll go to a handy tool called the Google URL builder.
- Enter the URL for your landing page and then fill in the blanks for the three fields (if you’d like, you can enter terms for the other ones like Term and Content, but that’s up to you.
- Hit generate URL and the tool creates the new URL that you will use for your advertisement.
Now, I would suggest the following. For this to really rock, you’re going to have to be somewhat specific. For example, wouldn’t suggest a source of “Project Wonderful.” The source should be the Web site on which you’re advertising through Project Wonderful.
If you’re advertising on three different sites through Project Wonderful, you can set up three, different tagged links using the URL builder. In other words, any time one of your variable changes, you need to build a new tagged URL to reflect that change.
Checking Your Results
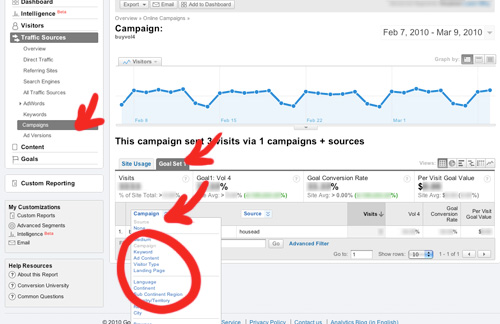
So, assuming your advertisement used the tagged URL, Analytics will begin gathering data based on when that landing page is hit — and from which source/campaign/ad style. To view your results, go to Analytics and look along the left-hand column:
- Click on Traffic Sources
- Click Campaigns
- You’ll see your new goal under the fever chart, next to Site Usage
- You can also get tons of great metrics under the Goals sections, such as Conversions and Conversation Rate.
Now you can begin to compare how certain types of ads with certain types of content play on certain types of sites. And you can see which ones are working best — and where they work the best.


Recent comments