Custom Navigation Buttons — Tutorial
 A special thank-you to Philip M. Hofer, “Frumph,” for walking me through this process.
It’s no secret. I despise some of the default navigation buttons that are included with webcomic CMS packages. The ones (as seen on the right) that come with ComicsPress are especially high on this list.
Personal aesthetics aside, using the default buttons kinda makes your site look like every other webcomic. It labels you as generic. Making your navigation buttons fit the look of your Web site is the first step towards separating yourself from the pack.
Although these instructions are written with Comic Easel in mind, I’m assured that the instructions are directly transferable to ComicsPress users.
To create your own set of navigation buttons, you may want to consider copying a current set. They are located in the /wp-content/plugins/comic-easel/images/nav/ directory. Drag a copy of one of the folders to your desktop. Open the image files inside the folder and redesign them to fit your site’s look. (But first, read the rest of these instructions!)
Along with the image files, each folder has its own navstyle.css file. This CSS file has all of the information inside of it which determines which graphics to use and how the buttons display on the screen.
Open one of the images and look at it. I’ll use the “previous” arrows from the Box button design as an example.

Note: this is a PNG file with a transparent background.
Notice that there are three different image “states” inside of a single image file.
- “Active” state: This part gets displayed when there is a comic it can travel to, but the mouse isn’t currently hovering over it.
- “Hover” state: Used when the user’s cursor hovers over the button.
- “Inactive” state: Used when there’s no comic to travel to (and it can’t be clicked). For today’s comic, the “Next” button would appear in the “inactive” state because there’s no “next” today; only “previous.”
The navstyle.css file takes this image file and moves it back and forth to display the portion of the image that corresponds to the state (active, hover or inactive). In our example, the button displays in a 44 x 44 pixel area. The image file is 132 pizels wide (and 44 pixels deep). Here’s the code that does it:
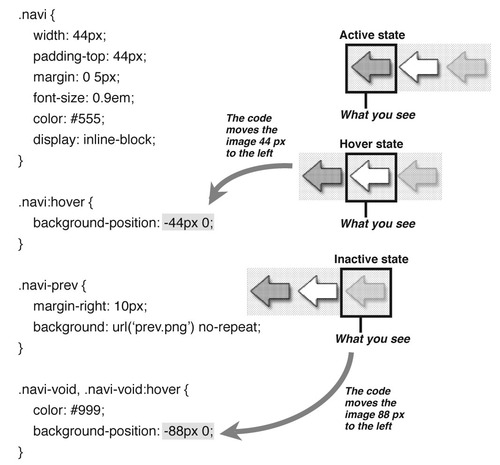
In the above navstyle.css, “.navi” is the element that contains the base information that is used in all of its states. This element contains the height and width along with other information on how the the button is displayed. The .navi-hover code moves the image 44 pixels to the left. The .navi-void and .navi-void hover code moves it 88 pixels.
Once you’re happy with your new buttons, you’ll want to upload them to your Child Theme folder — not the folder you originally got them from!
- On your desktop, rename the folder that contains your new buttons (so you don’t get these buttons confused with the originals).
- Go to /wp-content/plugins and open the folder of your Child Theme.
- If there’s not an “images” folder, create one.
- Create a folder inside this one named “nav.”
- Upload your custom-made button set here.
When customizing your own set of buttons, you can use whatever height and width you want for the buttons, but remembering to alter the code in the .navi portion of navstyle.css to reflect that change. The .navi-void and .navi:hover numbers will need to be changed as well. For example if your new buttons are 50 x 50 px, the image itself will need to be 150 x 50 px (width x height), then the .navi:hover will then need to be -50px instead of -44px, and .navi-void needs to move 2 states over so it needs to be -100px.
The comic navigation widget will only work inside one of the comic sidebars:
- Comic sidebars need to be enabled in the Comic -> Config (under the General tab).
- Next, go to the Navigation tab and disable “default navigation.”
- Select your personal navigation buttons from the dropdown.
- Finally, go to Appearance -> Widgets and drag the Navigation Widget into its proper place (usually the Under Comic sidebar).


Recent comments