You don’t need a subscription to read today’s post!
If you’ve ever been curious about the kind of information, tutorials and advice that you’ll get as part of your subscription to Webcomics.com, this is a good example.
If you’d like to join the site, you can get a 12-month subscription for $30 — or you can get a one-month Trial for $5 … with no obligation after your 30 days expire. For less than three bucks a month, you can get a steady flow of information, tutorials and advice targeted towards your webcomic business — plus a private forum to discuss issues with other professionally minded cartoonists.
If you’re like me, you’re looking at your ad revenue for this month and scratching your head.
Although you can chalk up the April ad slump to companies finalizing their budgets in the second quarter, it’s no help for the lost revenue.
So here’s five six tips for jumpstarting your own personal economy
Update your rate frequently
If you’re experiencing an ad slump — and if you’re using DFP to administer your ads — you should be checking in with your ad rates and adjusting them on a daily basis until this slump passes and your ad rates settle at a normal level. Scroll down to Adjust That Rate… in this archive post for a step-by-step.
Not using DFP (Google’s DoubleClick for Publishers)? If you’ve moved beyond the basic Project Wonderful or Google AdSense ad set-up — and if you’re running multiple ad networks — you should consider it. Here’s a tutorial on getting started.
Commissions List
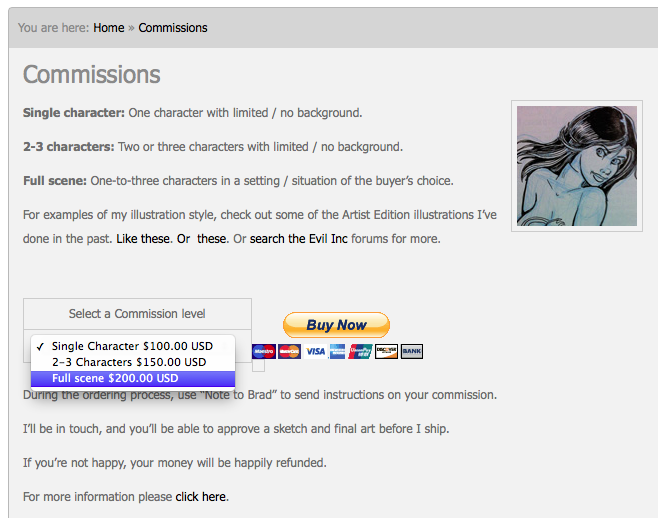
Put an announcement out on your Web site / social media that there’s room on your Commissions List this month (even if you really don’t have a list). I’ve found that this works best when you create a multi-option Paypal button that shows interested parties what they’d pay at different levels of commissions. This is my Commission Page as an example.

Users can select the options (and the price) that fits them best. When they make their payment, I get in touch with them and discuss the piece in more detail.
If you work in traditional media (ink on illo board, for example), don’t forget to mention that your client will get to keep the original art as part of the commission.
Patreon
 Your first impulse is going to be to start a Patreon page — and I’m not saying that you shouldn’t. However, Patreon is a means to monetize the audience you’ve already built. It’s not as effective as Kickstarter in introducing your campaign to new eyes.
So, yes, Patreon should be on your radar. (And here’s five great tips to help you get focused.) But before you do that, maybe this is the excuse you need to redouble your social media efforts. With a strong social media following, you’re going to have a much bigger reach when it comes time to seriously promote any crowd funding drive.
So take five minutes a day to pre-load your social-media feeds with good stuff for the entire day. Make it a part of your daily start-up routine. It will put you in much better position when you do announce that Patreon page!
Loss Leader
Take a page from your local Piggly Wiggly. Loss leaders bring people into your store where they’ll potentially buy additional goods. We’ve shared excellent advice on loss leaders here in the past. But let’s build on that a bit.
- If your eStore allows you to create coupons, why not introduce a steep discount (say 75%-off or even more) through the use of a coupon code?
- Better yet, offer an even deeper discount that you release solely through one of your social media outlets? That’s an awesome way to entice people to follow your social media feed — they could get huge discounts on your merchandize.
- Why not bundle some of your merchandise to entice people to buy multiple items at a huge savings?
Here’s the bottom line on loss leaders — and here, I’m talking predominantly to the members whose merchandise is mass-produced (as opposed to POD merch). You know what your unit cost is. You know how low you can mark those items down until you’re losing money. So go as far as you can go. It’s going to bring a little much-needed funds into your account, and it might just spur some extra business.
Repackage, repackage, repackage
That’s the webcomics mantra — and so many of us forget it. You’re a creator of quality content that you produce on a consistent basis. But you’re probably so wrapped up in what’s on your site right now (and what you’re working on for tomorrow) that you’ve forgotten all about all of those yesterdays that brought you here.
It’s still valuable, and it’s still sellable.
This is tremendously effective in digital publishing (eComics, eBooks, etc.). Package up several ePubs from your archive and offer them at a special bulk rate. For example, I package all of the upcoming strips for each month as a monthly Evil Inc comic. Then I package all of the Evil Inc monthly comics into 6-month bundles. Then I repackaged those into 12-month annuals.
Every swing brings in a little revenue — and exposes new readers to the other digital offerings in my store.
Original art auction
Every other month or so, I’ll take a handful of originals from a few comics that got good response on my site and post them on eBay. I set the initial bid low ($10-$20) and then promote it on my site/social media.
It’s a great way to remind people that you sell originals — and you just might foster a bidding war over an art piece that several people want.
Use this handy eBay widget to create a carousel you can embed in your blog to display and promote the auction while it’s in progress.
So… how about you?
What’s your favorite go-to when you need to make a little money happen?
